Get More From Depth Vector
Match the app to your gear, get the right line out reading, and keep the setups that work. Start with the calculation, then follow the screens from one rod to a full spread and trip log.
Depth Vector App Help. Updated . Not available yet. Launching on the App Store and Google Play in December.
Search a word or question, or browse the topics below.
How Line, Lure, And Speed Become A Line Out Reading
There is no single line out number for a depth. Depth Vector works from the line, lure, speed, and rigging on your rod. Change one, and the same counter reading can produce a different running depth.
- Line
- Material and diameter affect drag. Two lines with the same pound test can have different diameters. Leadcore and copper also contribute weight.
- Lure
- The selected model and size tell the app how the lure dives. A different size of the same lure can have a different dive curve.
- Speed
- Water moving past the tackle affects its pull and drag. The effect depends on the rig, so faster does not mean deeper for every setup.
- Line Out
- The app works out how much line the selected setup needs for your target, then accounts for applicable setup measurements and reel calibration.
More line does not buy the same amount of depth forever. If the app shows Max Line Out, the target is beyond what that setup can reach within the calculation's range. Recheck the inputs or choose a reachable target.
What The Calculation Cannot See
The app calculates depth; it does not measure your lure underwater. Current, waves, turns, weeds, bottom contact, and worn tackle can change the actual result. GPS shows boat speed over ground, while the lure responds to water passing it. Hold a steady speed and leave clearance above bottom.
Three Measurements Worth Getting Right
Does 100 On Your Counter Mean 100 Feet Of Line?
If the counter reads 100 but you have actually let out 118 feet, you are fishing 18 feet more line than that number suggests. A calculation that assumes 100 feet is describing a different setup. That does not mean an 18 percent depth error; depth does not increase in a straight proportion to line length.
A checked counter lets you repeat the amount of line you intend to fish. Depth Vector can save a correction with the rod and show the counter number that matches the calculated line length.
- Measure a 100 foot distance. With the line end at the rod tip, zero the counter.
- Pull out that measured distance with light tension and note what the reel reads.
- Open Calibrate Line Counter in Edit Rod or through the result's Calculation Details. Enter the counter reading at 100 measured feet, then save the calibration and the rod.
The app asks for the reading at 100 actual feet, not the distance released when the counter reaches 100. Keep the spool properly filled and recheck after changing line or spool fill.
Set Rod Tip Height Where You Actually Fish It
The reel counts the line between the rod tip and the water too. Enter the tip's normal trolling height so the calculation can account for that line above the surface. Otherwise, the line assumed to be working underwater can be wrong.
Use the full displayed Line Out number. Do not subtract rod tip height yourself; the length of line in the air also depends on its angle. Use zero for a planer board or a rod tip at the water. Downrigger calculations do not use rod tip height.
Set The Same Depth Reference As Your Sonar
If sonar reads from the transducer, measure from the waterline to the center of the transducer face and enter that distance in Boat Setup. A sonar reading of 20 feet with the transducer 18 inches underwater means about 21.5 feet from the surface.
Leaving that offset out shifts every target based on that sonar reference. If your sonar already reads from the waterline, enter zero in the app so the distance is not added twice.
Find Line Out Or Find Running Depth?
- Find Line Out
- You know where you want the lure to run. Enter the target depth and your setup. The app gives you the reel counter setting, or a Ball Depth setting for a downrigger.
- Find Running Depth
- You know how much line you are fishing. Enter that amount, the setup, and speed. The app calculates the depth the lure would run.
Use Find Line Out when choosing a presentation for fish marked at a particular depth. Use Find Running Depth when checking a familiar setup or a fixed length of leadcore. You are working through the same setup from opposite starting points.
Bare Line: From Setup To Line Out
Start on the Depth screen with a lure tied directly to your line, without a snap weight, diver, or downrigger. Choose Find Line Out.
1. Choose The Line On Your Reel
Tap Line. Search for the product or browse the available line type, brand, model, and pound test. Check the diameter shown for the selection. The catalog supplies that diameter to the calculation.
If you do not know the exact line, choose a supported Generic option for the material and pound test you know. It gives you a starting point using an assumed diameter. Generic choices are not available for every line type; the current catalog does not offer generic braid. Replace a generic choice with your actual line when you identify it.
2. Choose Your Lure, Or Create One
Tap Lure. Search or browse by brand, model, and size. Match the actual lure rather than picking another size because its name looks close.
If you cannot identify the lure or find it in the catalog, open Custom Lures, then New. Give it a recognizable name and enter its shallow running depth, deep running depth, and length. Save it to make it available under Custom Lures.
Use the best information you have for those fields. A custom entry is a starting point, not a substitute for a known lure's dive data. Naming an unknown lure does not establish how it runs.
3. Confirm Lure Only And Rod Tip Height
In Rigging, select Lure Only. Enter the rod tip's normal height above the water. Confirm your reel calibration and the sonar reference described above.
4. Set Your Speed And Target Depth
Set Trolling Speed to the speed you plan to hold, then choose Target Lure Depth. GPS does not automatically change the Home calculator's target speed.
5. Read Line Out And Fish That Setting
The result at the bottom is the full reel counter number for this setup, including applicable calibration and line above the water. With the lure at the rod tip, zero your counter. At steady trolling speed, let out line to the displayed reading and let the lure settle.
6. Tap The Result To See How It Was Calculated
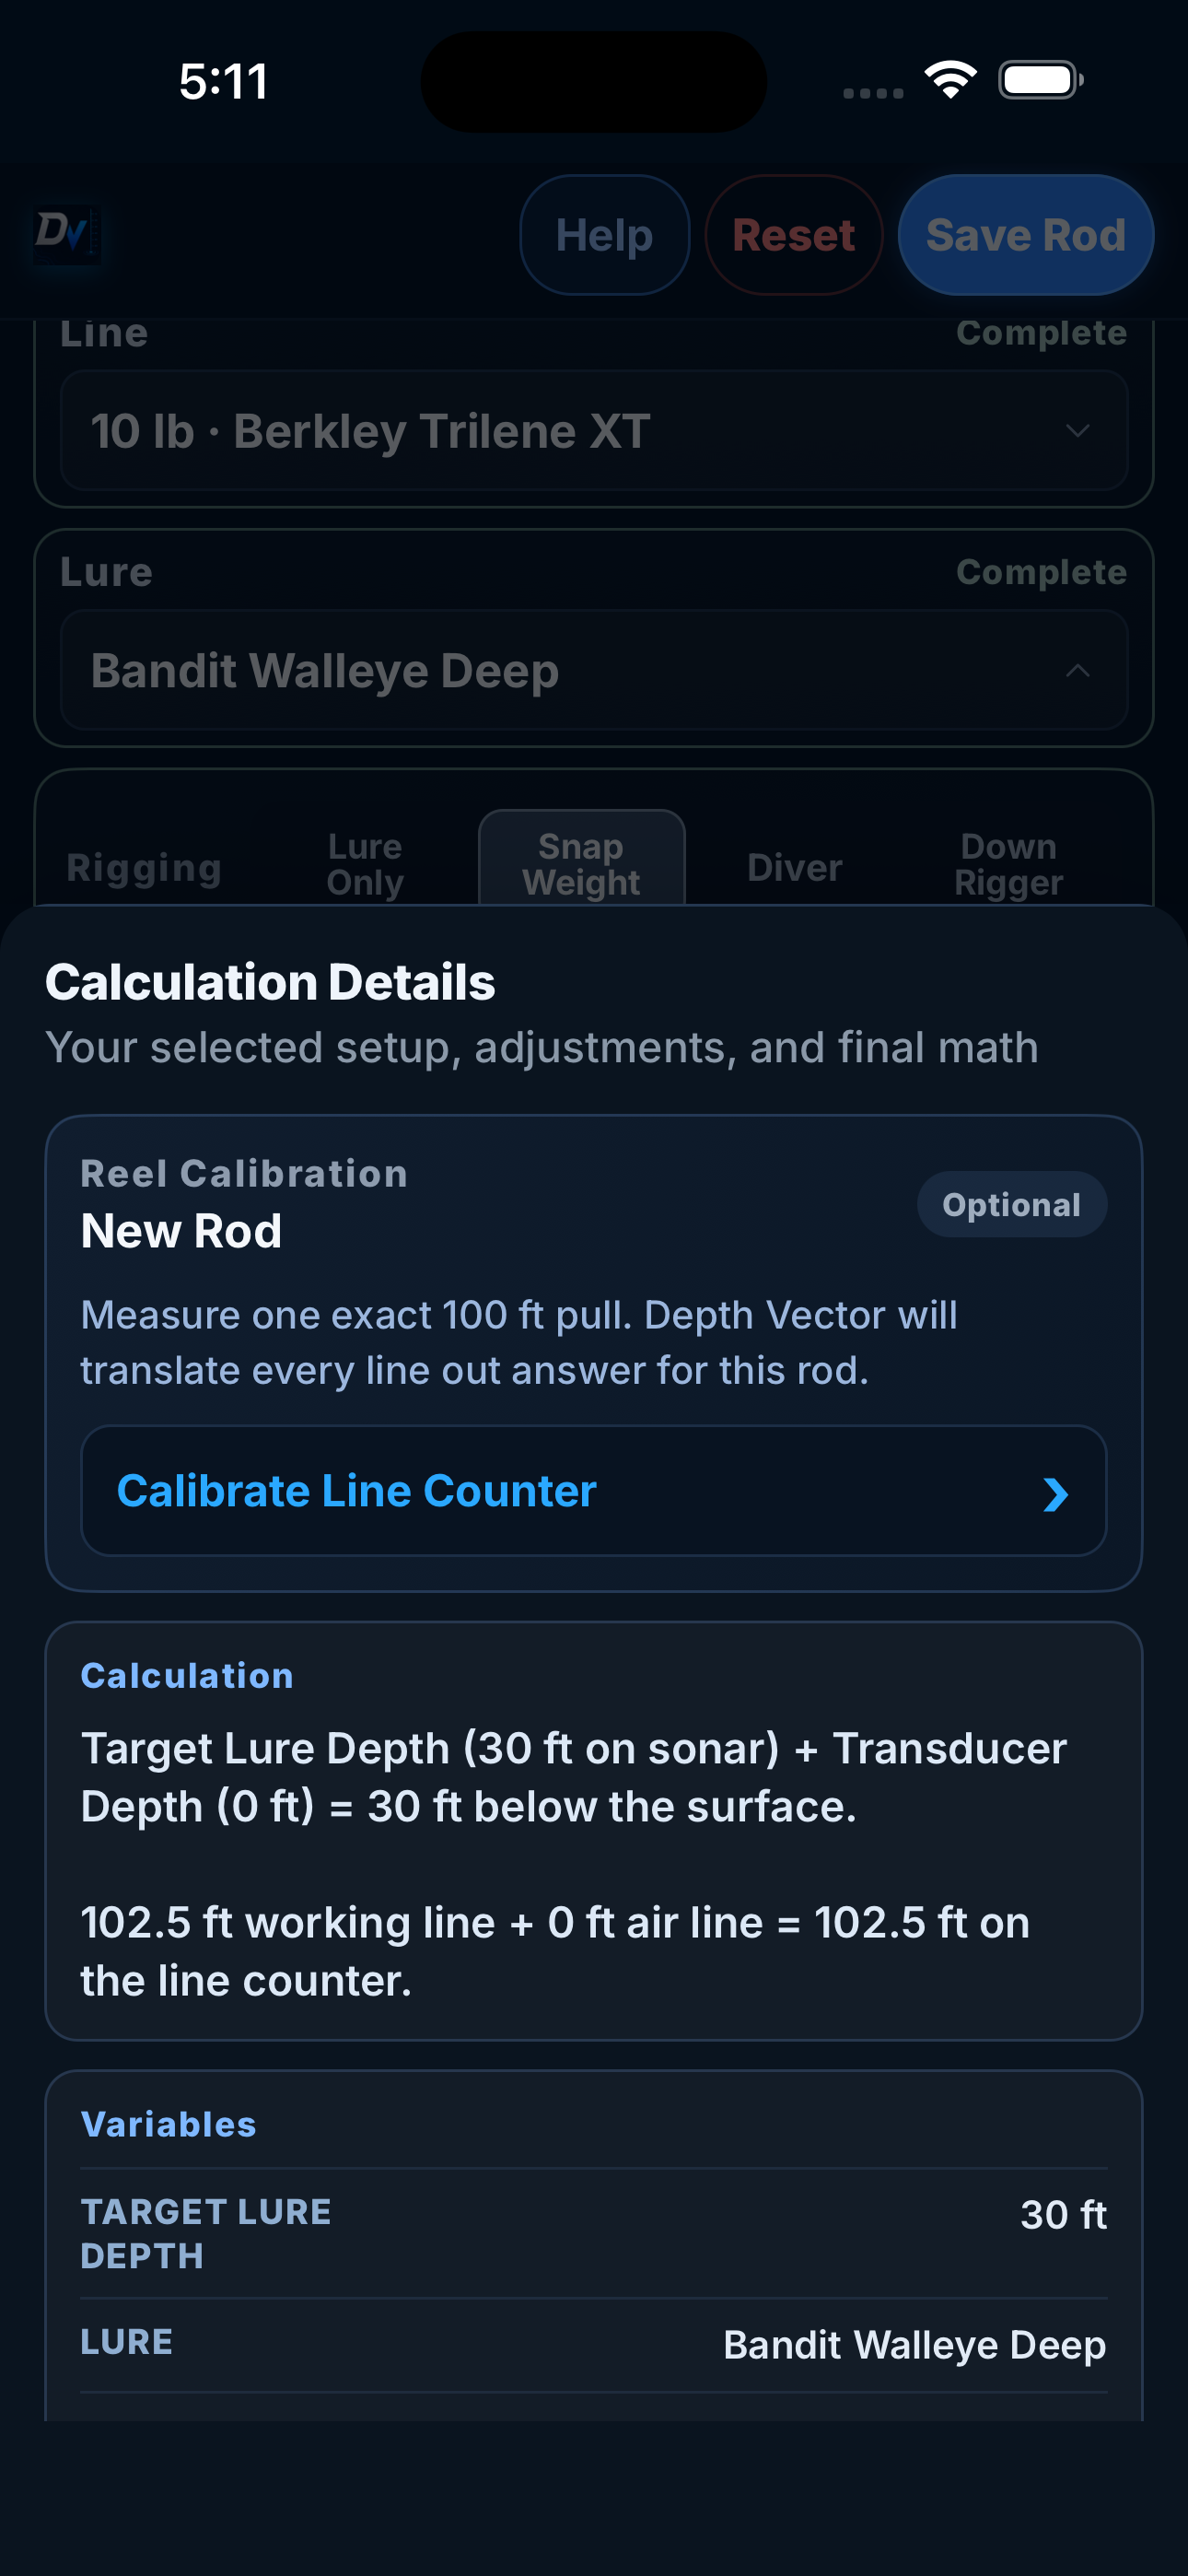
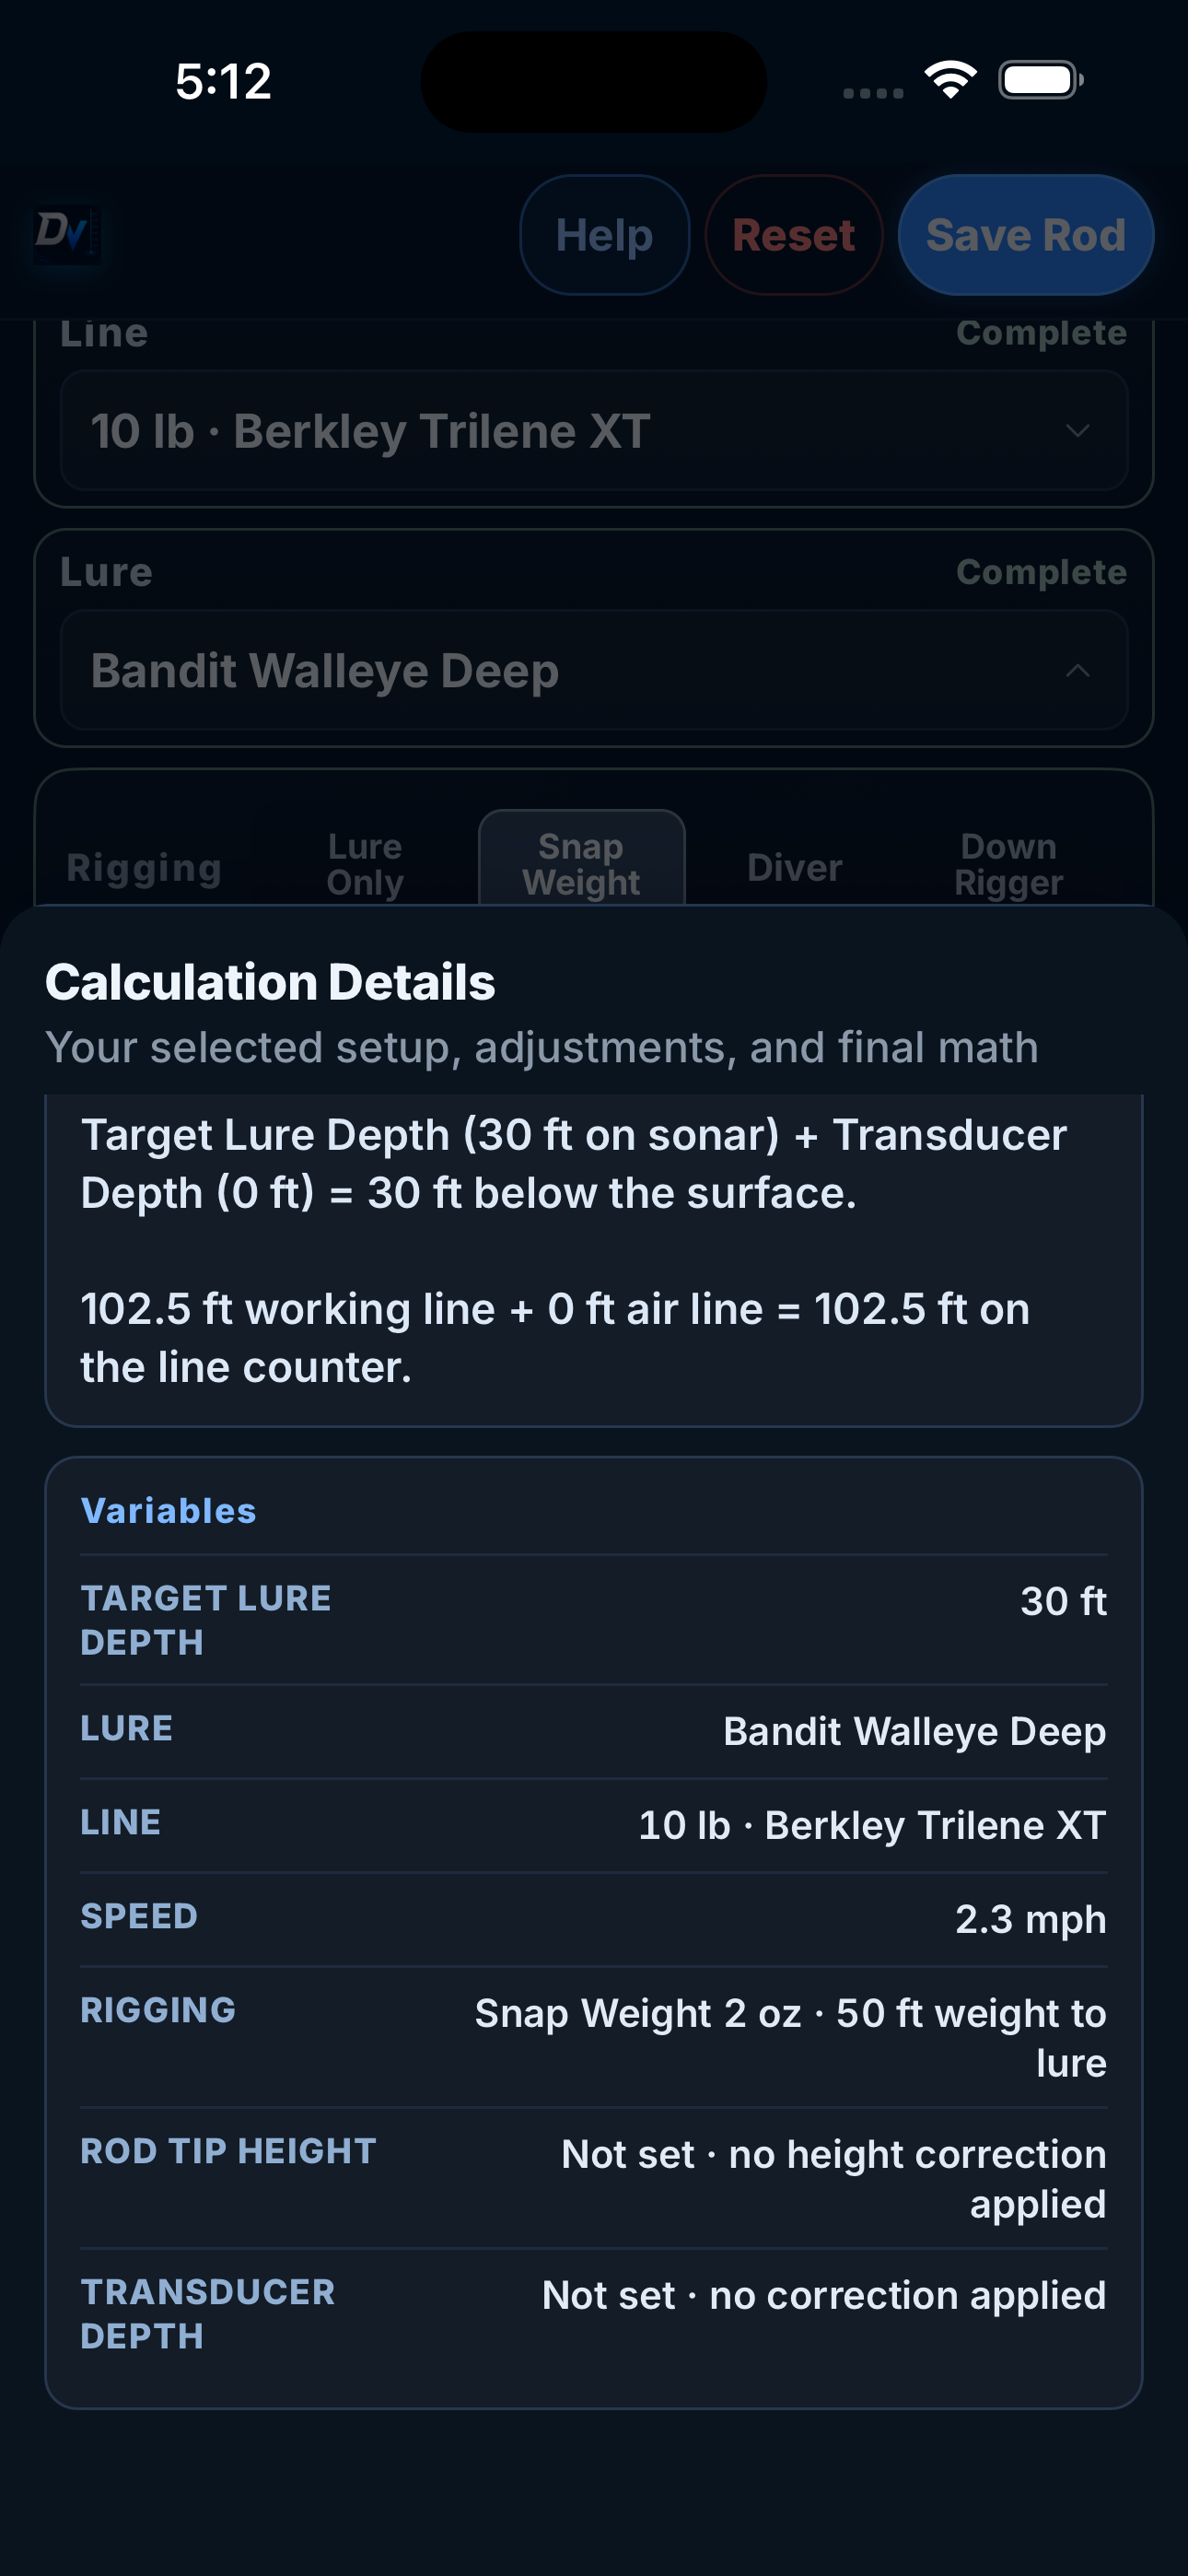
Tap the large Line Out reading to open Calculation Details. It shows the selected gear, variables, adjustments, and final math. This is the place to look when you wonder why a number changed or whether a measurement was included. The Running Depth and Ball Depth results open details too.
Find Running Depth: Your Three Color Rod
You regularly fish 50 feet of leader, three colors of leadcore, and 50 feet of backing. You want to know where that setup runs with the lure you are using.
- Select Find Running Depth.
- Choose the leadcore product and pound test on the rod. Set Colors On Spool to 3, meaning the amount installed on this rod.
- Set Leader Length to 50 feet. Choose the actual lure, or your custom entry.
- Set Backer Line Out to 50 feet. This is the backing you have let out beyond the leadcore, not all the backing on the reel.
- With backing out, all three colors are deployed. The app sets the weighted Line Out amount to 90 feet. Confirm that value, the rod tip setting, and the speed you plan to hold, for example 2 mph.
- Read Running Depth at the bottom. Tap it to inspect the calculation. Change the lure or speed to see how that same length of line fishes with the new selection.
The lengths add up to 190 feet: 50 feet of leader, 90 feet of leadcore, and 50 feet of backing. Do not put 190 into the weighted Line Out field. The leader and backing have their own entries.
In this setup, the current calculation assumes 12 pound fluoro for the leader and 20 pound mono for the backing. The backing adjustment is provisional and applies after the selected weighted line is fully deployed. Treat the result as a starting point, especially if your materials differ. Three colors alone do not establish a fixed depth; the selected leadcore, lure, leader, backing, and speed all matter.
Set Up A Snap Weight
Start with the same line, lure, speed, and rod tip checks. Then change Rigging to Snap Weight.
- Select the weight you are clipping on.
- Enter Weight To Lure, the line length between the snap weight and lure.
- In Find Line Out, set your target depth and read the full counter number.
- Let out the Weight To Lure distance, attach the weight, then continue until the counter reaches the displayed Line Out number. Do not zero the counter again at the weight or add the first distance to the result.
In Find Running Depth, enter the full counter reading already out, with the same weight and Weight To Lure distance. The app then calculates the lure depth for that deployment.
Supported snap weights run from 0.5 through 3 ounces. The calculation uses manufacturer chart references based on 10 pound mono. Its reference speed chart covers 1 through 2 mph; faster results through 4 mph use a modeled extension.
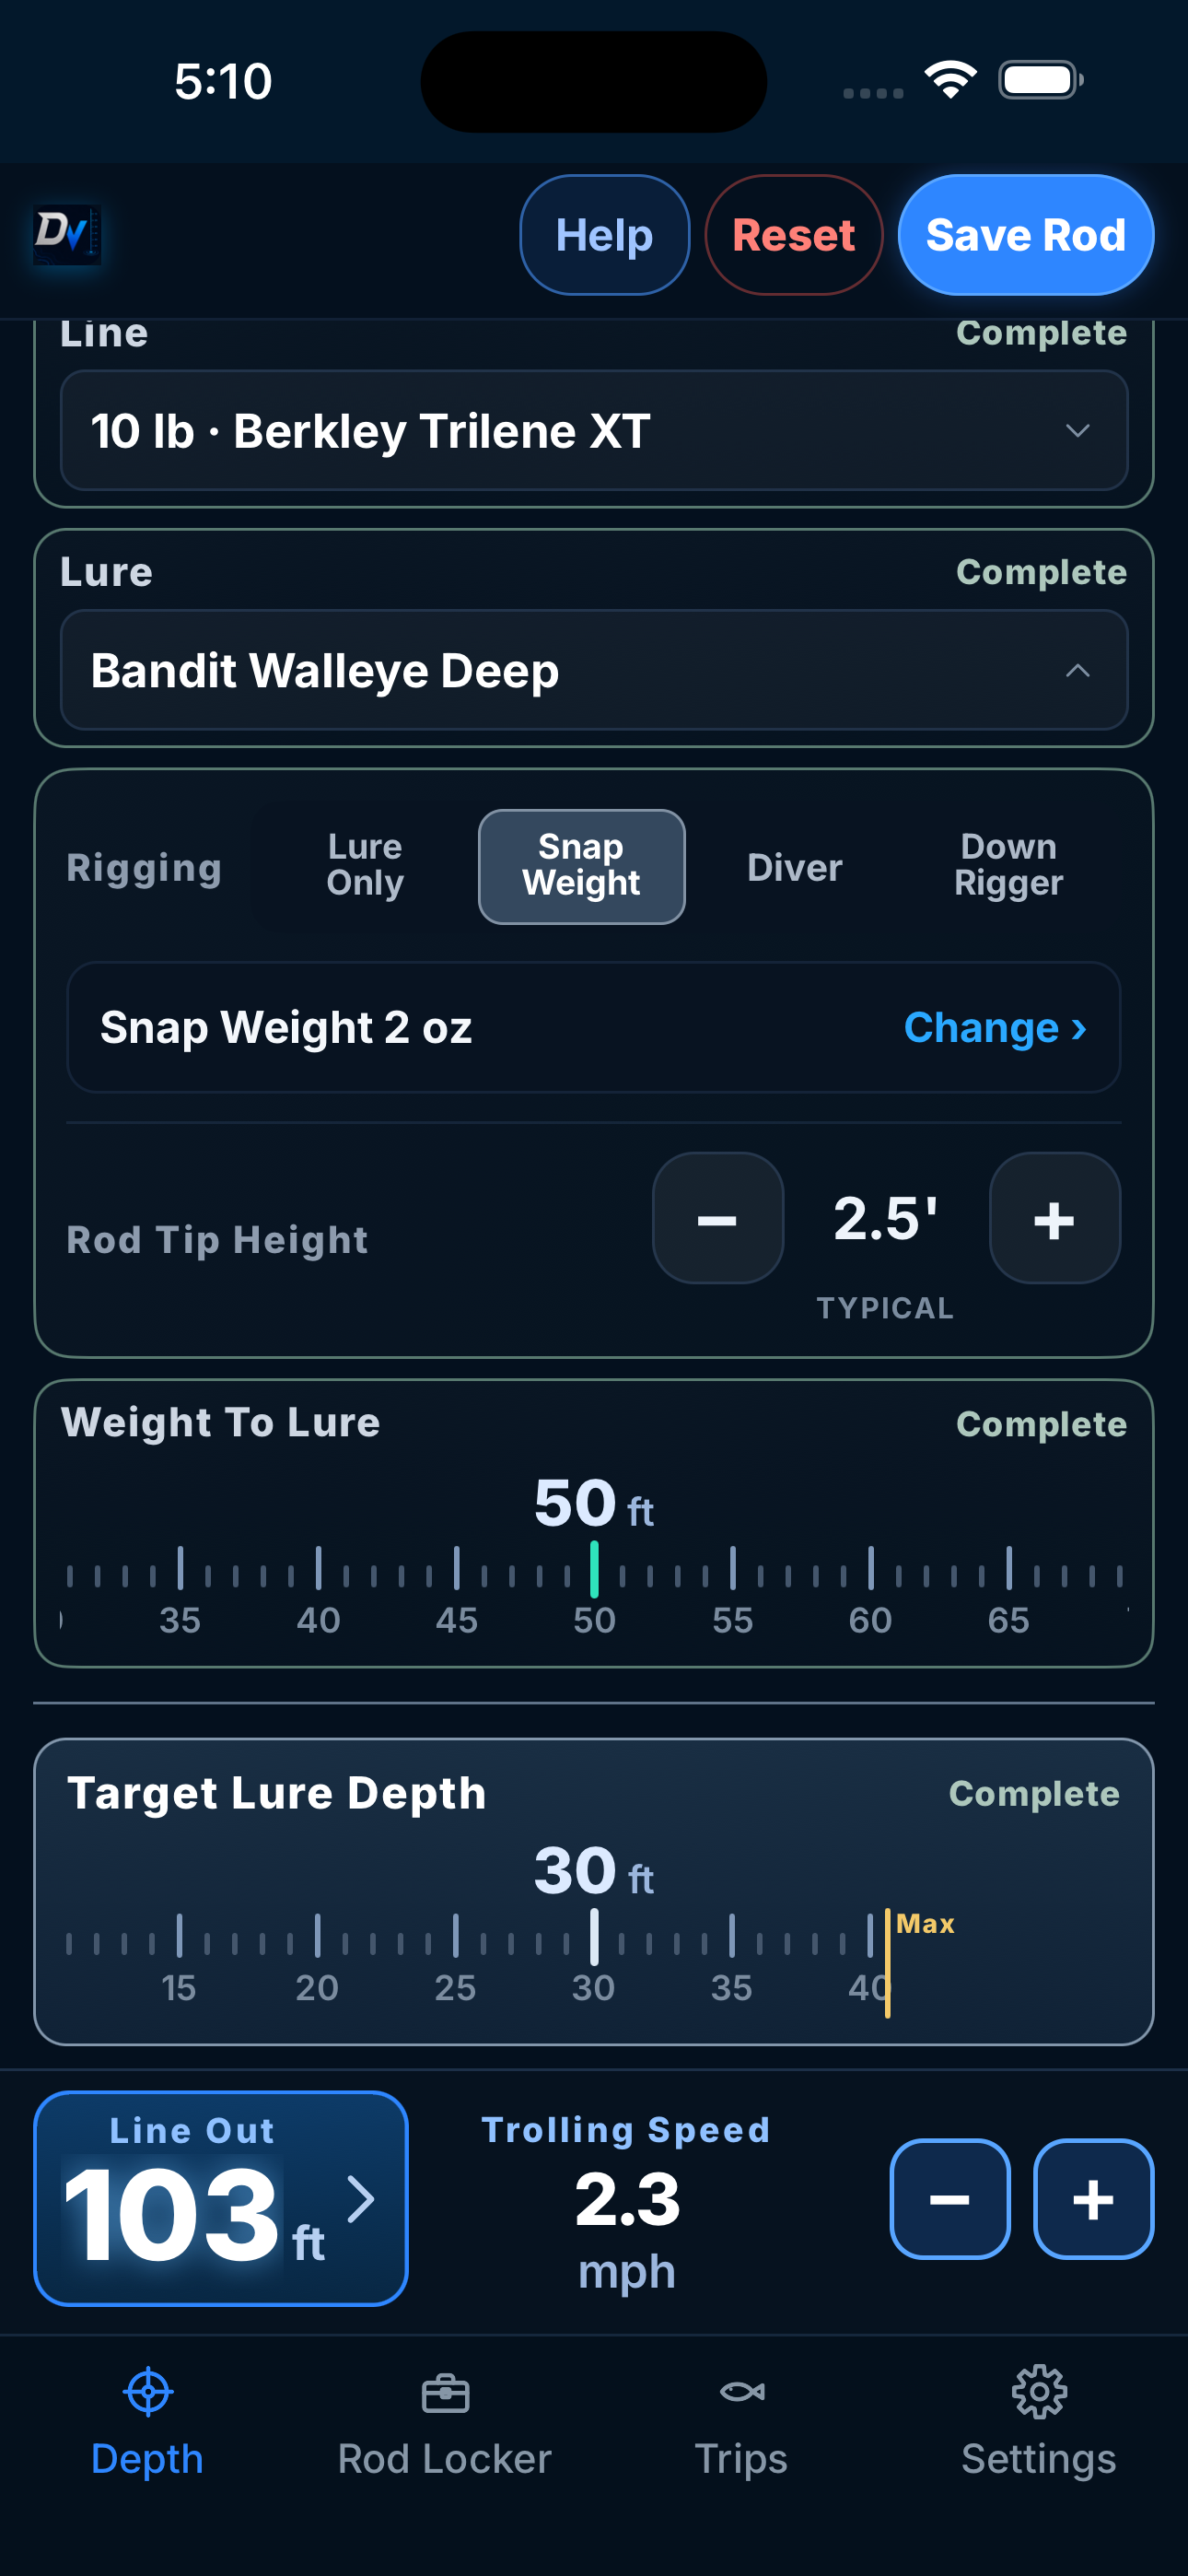
The pictured 50 plus 2 setup uses a Bandit Walleye Deep on 10 pound Berkley Trilene XT, with a 2 ounce snap weight clipped on after the first 50 feet. For a 30 foot target at 2.3 mph, the app gives a full line counter reading of 103 feet. This is the result for the pictured setup, not a setting for every lure or snap weight.
Open Full Size
Open Full Size
Open Full Size
Set Up A Diver
Choose Diver in Rigging, then match the device you actually fish.
- Select the diver model and size. Confirm its setting and ring option where those controls are offered.
- Enter Leader Length, measured from the diver to the lure.
- Select the line and the lure or terminal tackle behind the diver. Enter trolling speed and rod tip height.
- In Find Line Out, set target depth and use the resulting counter reading. In Find Running Depth, enter the full counter reading already out to calculate lure depth.
The selected diver, setting, line diameter, speed, and lure all belong in the setup. Depth Vector uses the maker's speed chart where available.
A selected catalog crankbait can continue diving behind the diver. A fly, flasher, or other terminal selection adds no crankbait dive. Drag from that terminal tackle can make the diver run shallower, and that extra drag is not modeled yet.
Set Up A Downrigger
Choose Down Rigger in Rigging and select the ball weight. The result now refers to the downrigger setting.
- Match the fishing line and lure.
- Set Lure Setback, the line length from the release clip to the lure.
- Check Release Clip Above Ball, the vertical distance between the ball and clip. Watch the displayed units; this is a different measurement from setback.
- Enter trolling speed and target lure depth. Read Ball Depth and use that number on the downrigger counter.
In Find Running Depth, enter the Ball Depth setting you are already using. The app calculates lure depth from that setting, the release position, setback, lure, and modeled blowback.
Blowback is the cable and weight trailing behind the moving boat. Ball Depth is a calculated counter setting, not a measured underwater ball depth. Rod tip height is not used for this calculation.
Save The Rod And Stop Entering It Again
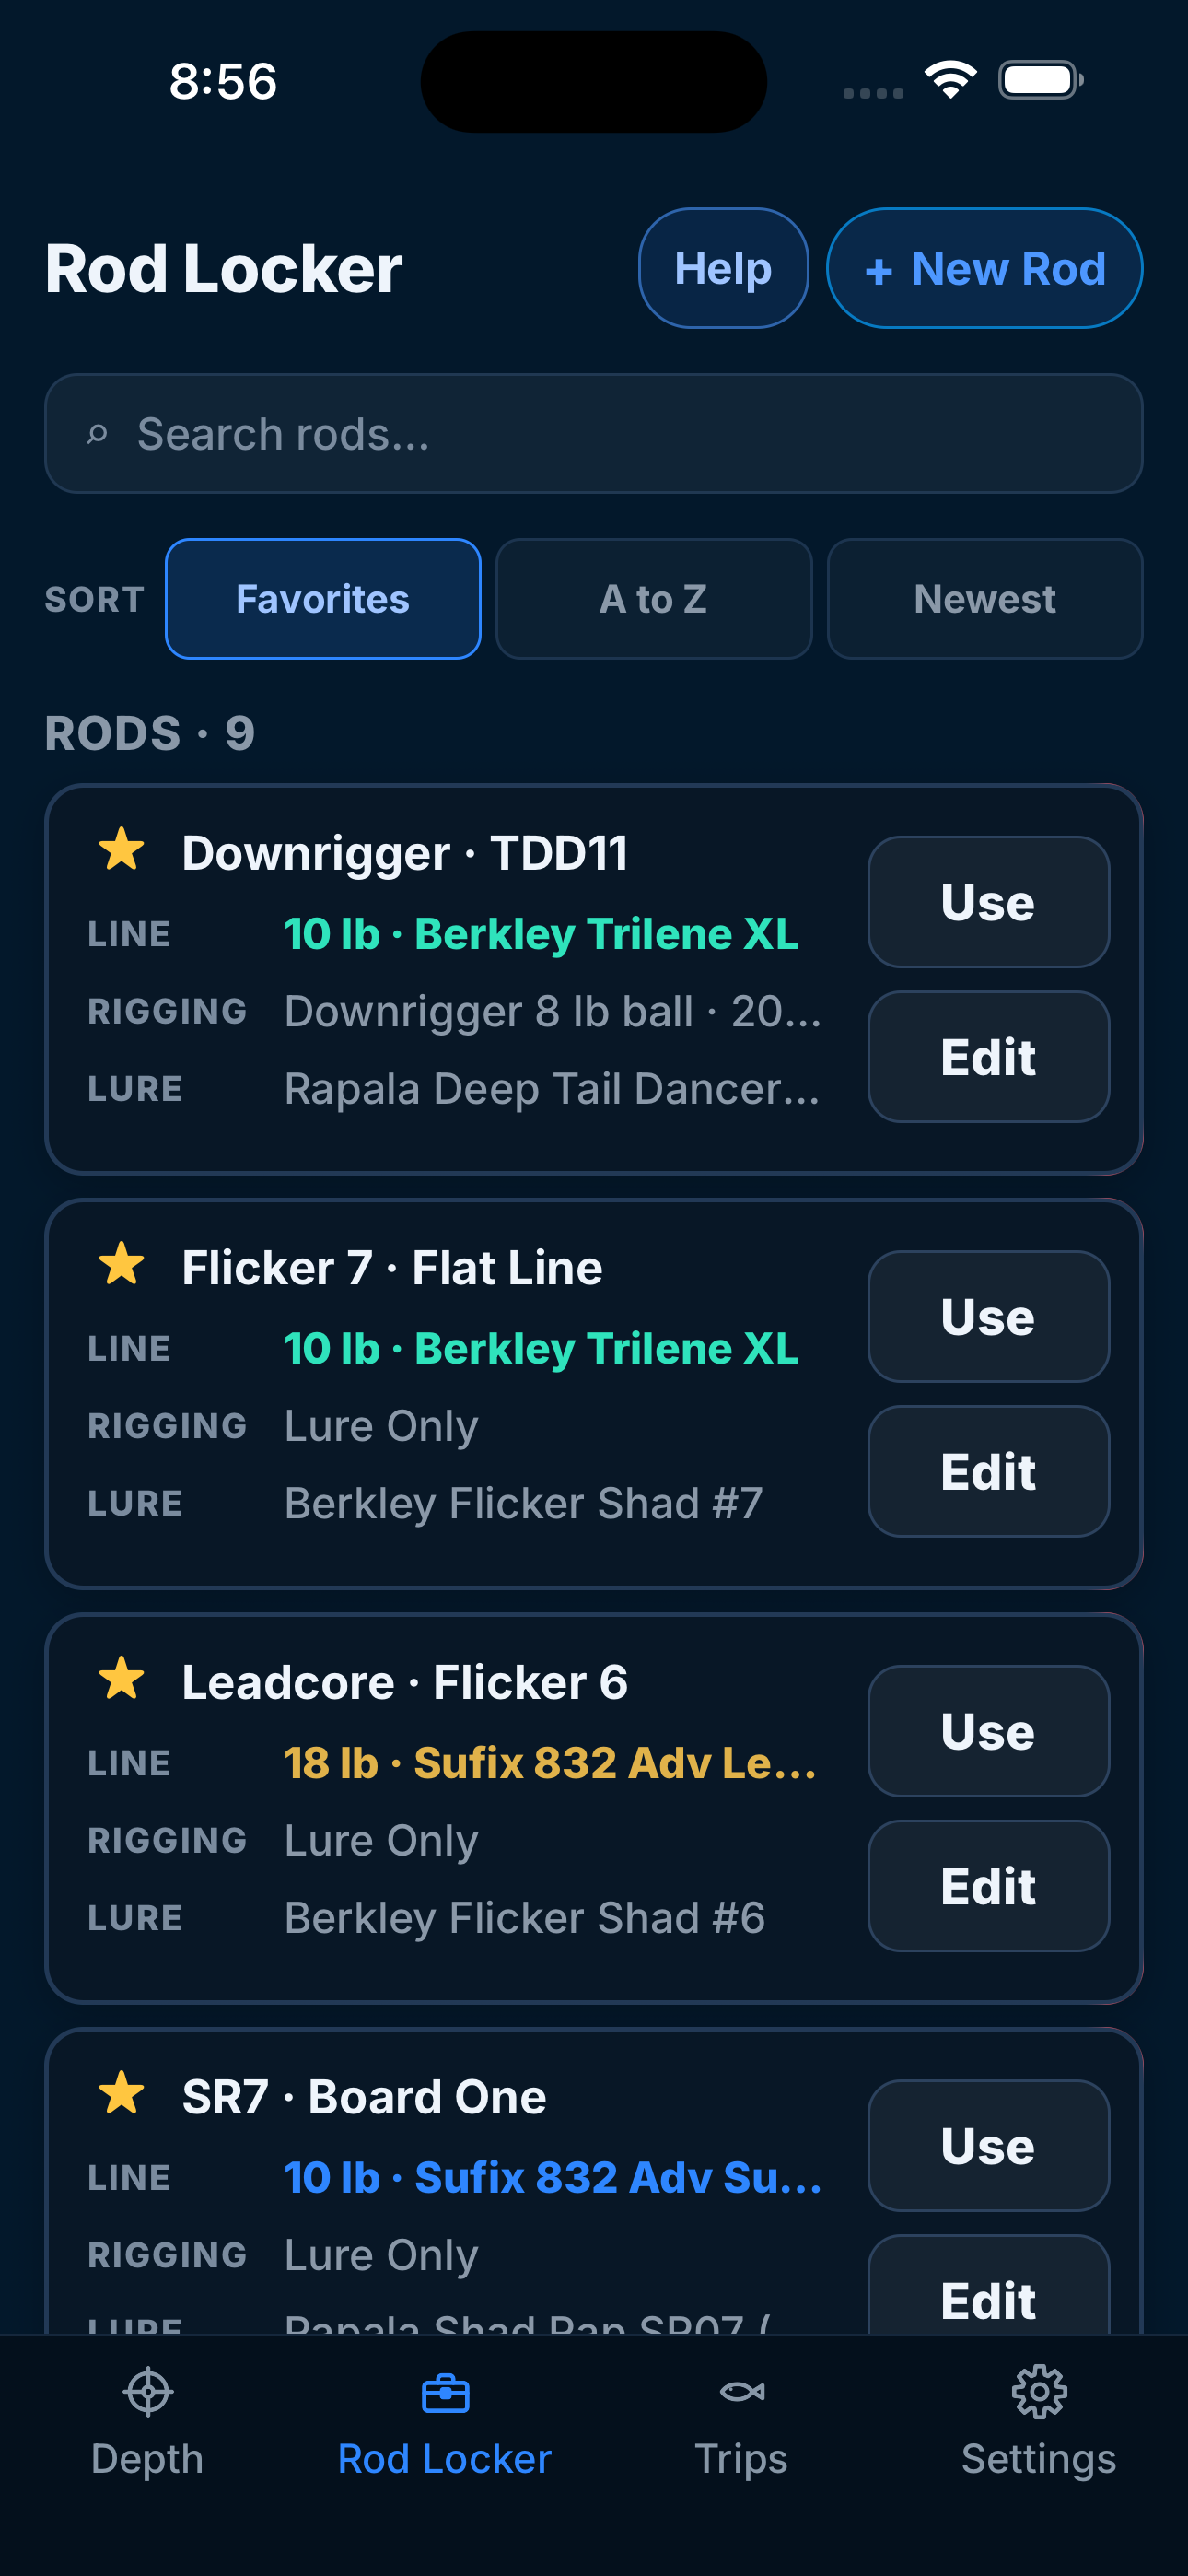
Most of a rod's setup stays the same between passes. Saving it keeps the line, rigging, measurements, and applicable reel calibration together, so you do not rebuild the setup every time you fish.
- After setting up the rod on Depth, tap Save Rod. You can also build one through New Rod in Rod Locker.
- Give it a name you recognize. Use search, Favorites, or sorting in Rod Locker to find it again.
- Tap Use to load its setup into Depth. Change the lure, target depth, or speed for the next pass while keeping the rest of the loaded settings.
- If the saved equipment setup should change, use Update Rod. Use the new rod flow when you want another saved setup.
Depth and speed are fishing choices for the current calculation or trip. You do not need another saved rod just to fish the same tackle at a different depth.
What Does Reset Clear?
Reset Without Saving clears the calculator and unloads its rod. It does not delete your saved rods, spreads, or trips. Save or update changed equipment first if you want to keep it.
Open Full Size
Build A Spread You Can Start Together
A spread is a saved group of rods you plan to fish together. Build one for a familiar program so the next trip starts with those rods ready, instead of selecting and setting up each one again.
- Open Trips and choose New Spread.
- Enter a name, such as Reef Edge Program, and tap Create.
- Add the rods you want from Rod Locker, then arrange their order to match how you work them in the boat.
- Use that spread when starting a trip. Check the rods before you begin and adjust the trip's working setups as needed.
A saved rod remembers one rig. A spread remembers the group. Starting a trip creates the fishing session for that group; changes to the trip's working rods do not automatically rebuild the saved spread.
Start A Trip And Work Your Rods
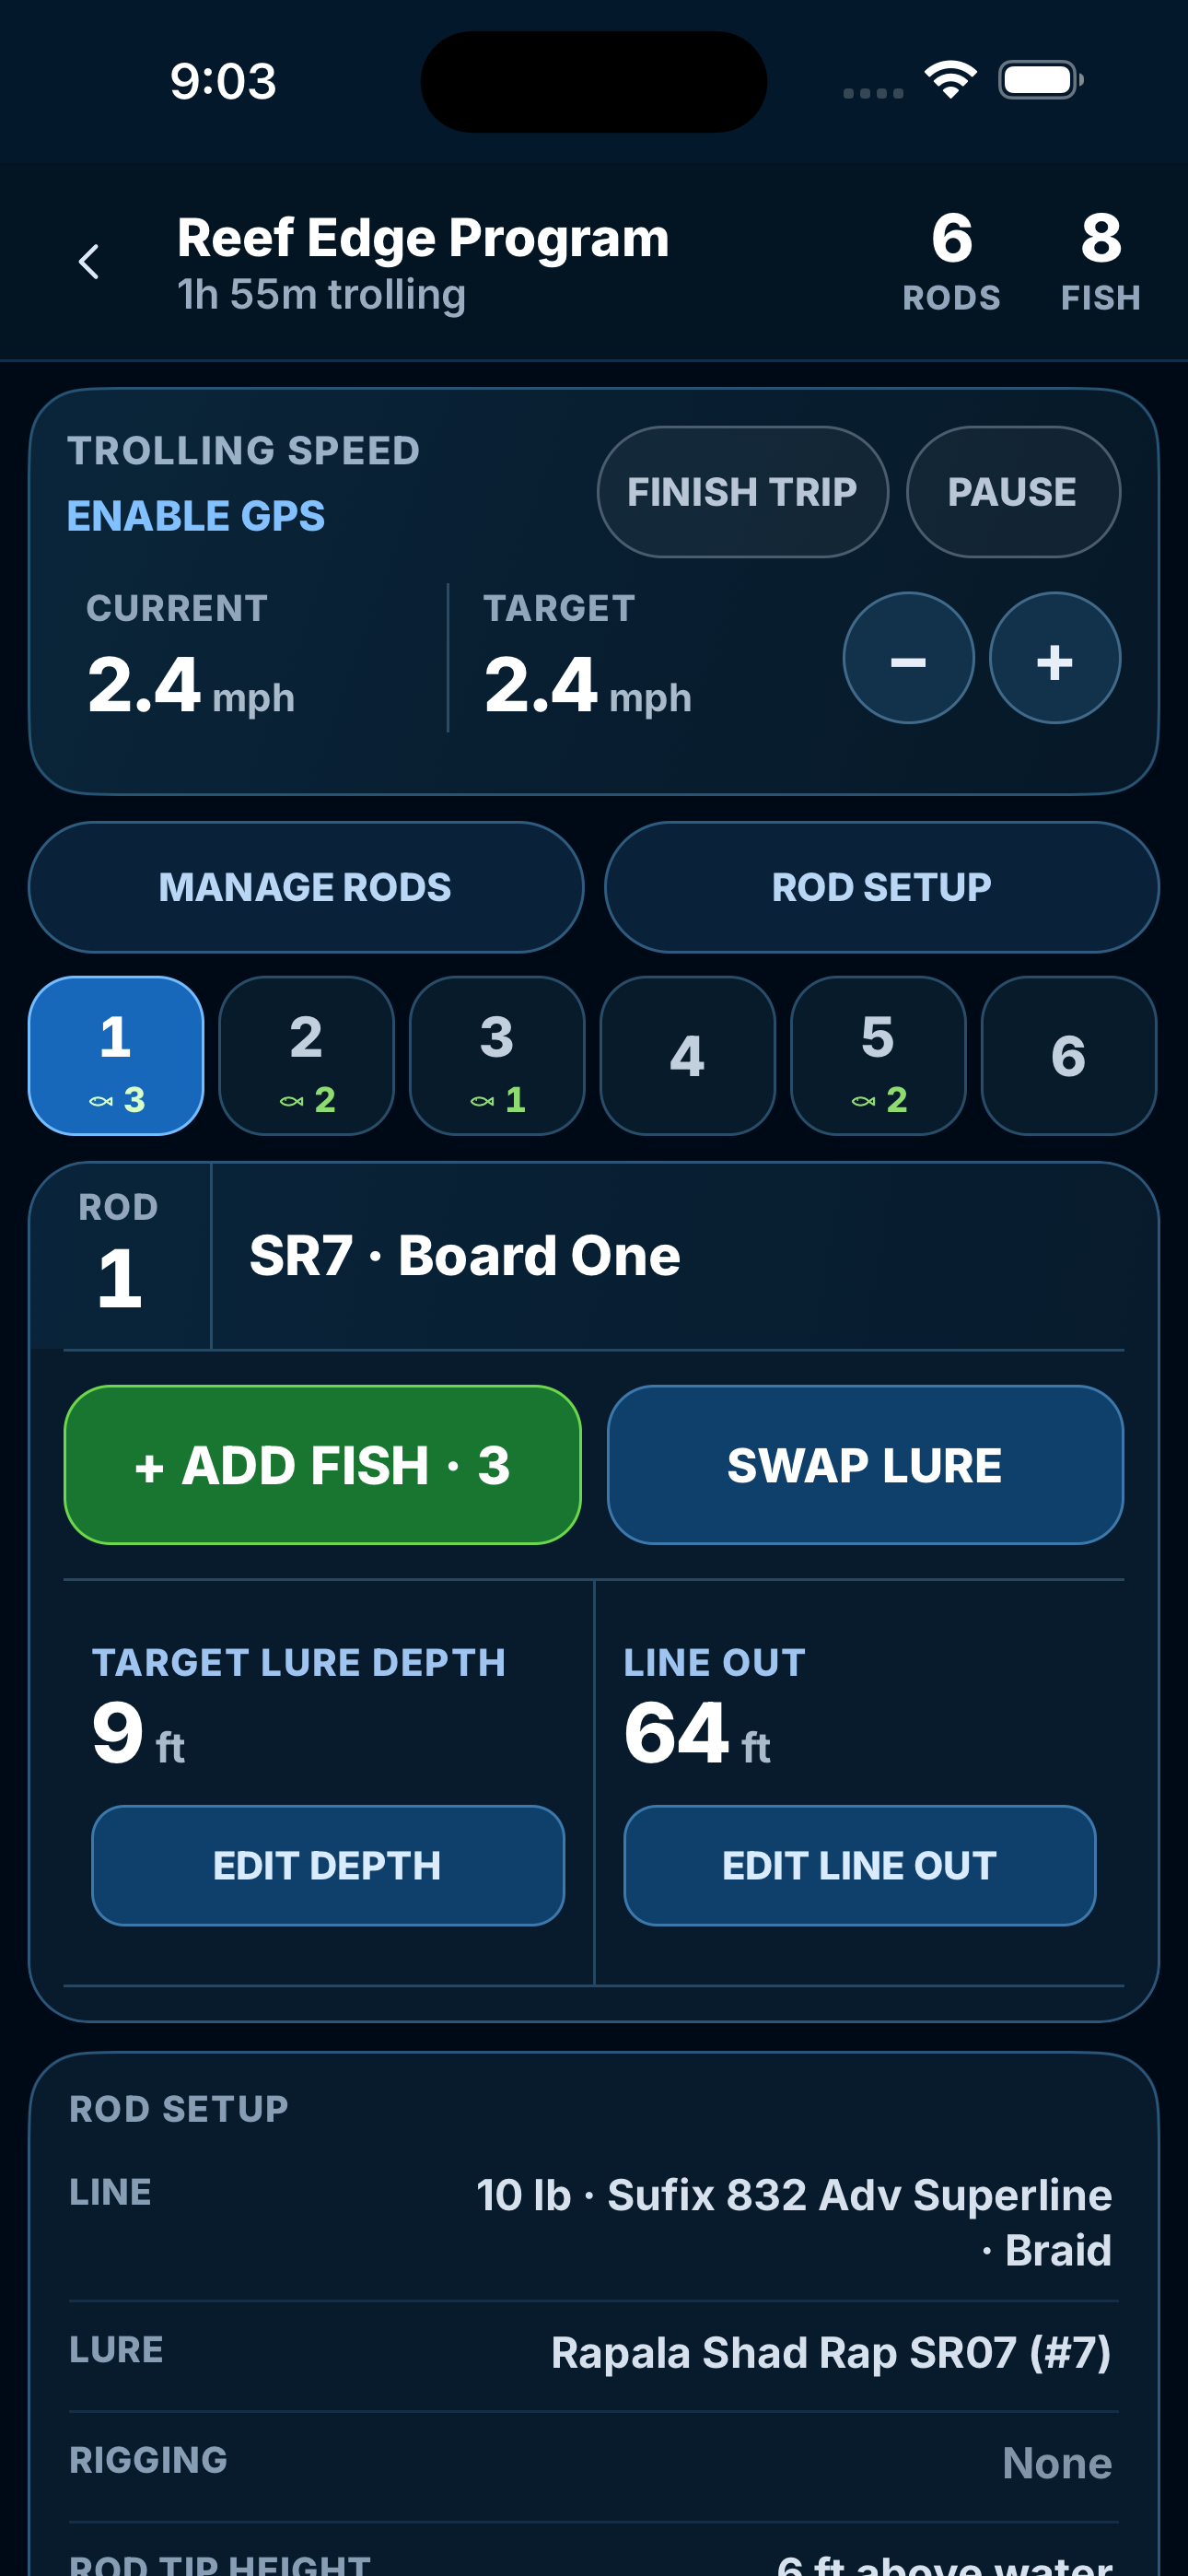
In Trips, choose your spread, review the rods, and tap Start Trip. The Active Trip screen brings the rods, targets, line out readings, catch counts, speed controls, and elapsed fishing time together.
Use The Controls As You Fish
Select a rod to work on it. Use Swap Lure when changing the bait and Edit Depth when changing its target. Use Rod Setup for other gear changes. Tap Add Fish on the rod that catches one, so the record stays with that setup.
Enable GPS if you want to compare measured boat speed with the trip target. It is optional and does not change the Home calculator's target speed. Tap Pause when the lines are not fishing, then resume when they are back in.
Finish The Session
Tap Finish Trip to keep the session in Trip Log. It saves the time, spread, catch count, measured speed when available, and available weather. Log each fish when it happens so its recorded time and conditions reflect that catch.
Open Full Size
Add Weather When The History Is Useful To You
A weather location lets Depth Vector attach local conditions to the trip and catches. Later, you can look back at the rigs and depths that produced fish alongside temperature, wind, barometer, moon phase, and sky cover when those readings were available.
- Fishing Where You Are Now
- Choose Current Location for weather near the boat. It requests location permission and uses a rounded area when the trip starts, a fish is logged, and the trip ends.
- Planning Ahead Or Keeping GPS Off
- Search for a town, lake, or ZIP near where you will fish. Choose the fishing area rather than your home location if they differ. A selected place can appear in Trip Log.
- Fishing Without Weather
- Leave weather off. It is optional and does not block a trip. You can still use the app and record your rods and catches.
Current Location weather and live GPS speed are separate choices. Enabling weather does not turn on live speed. The precise weather location is rounded on the device; the app does not save a route or exact GPS coordinates with the trip.
Use the log if having a history helps your fishing. Over time, compare which rods, depths, and conditions repeat on your better trips. Weather describes the selected area, not a reading taken on your boat.
Need Help With A Setup?
Email [email protected]. Include the line, lure, rigging, speed, and a screenshot of the result or Calculation Details.